Monday, April 14, 2014

Weekly Reflection 7- The Camera and The Nature

Weekly Reflection 7
24/ 3/ 2014

Weeks of lectures delivered reached the moment to test our very own skills to practically put all theories into action. As I have mixed mode short course from 2pm to 5pm today, I missed the lecture delivered in the studio room. However, I was still able to join the live capturing practices at Tasik Ilmu UTM. We departed excitedly and as soon as we arrived, Encik Fuad shared with us his recommended settings which was listed as below:


  1. White Balance: Direct Sunlight
    (A SQUARE TO LEFT TO PRODUCE NATURAL PHOTOS)
  2. Focus mode: Single Servo
  3. Auto-Focus Area mode: Single Point
  4. Metering: Matrix
After the adjustment, the lessons started! Below were the pictures I took during the whole capturing session.

f/4 | 1/800s | ISO 100 (Nikon D3000@18mm) 
f/5.3 | 1/640s | ISO 100 (Nikon D3000@46mm)

f/5.6 | 1/800s | ISO 100 (Nikon D3000@29mm)

f/5.6 | 1/500s | ISO 100 (Nikon D3000@32mm)

f/5.6 | 1/640s | ISO 100 (Nikon D3000@55mm)

f/5.60| 1/640s | ISO 100 (Nikon D3000@55mm)

The ducks were the main character on that day.

It was a great experience to have this hands-on activity to let me be more familiar with the settings and to be able to catch the sweet angle more precisely.

Weekly Reflection 6- The Light in The Dark

Weekly Reflection 6
17/ 3/ 2014

Today Encik Fuad came to deliver a lecture on using flash light to get a better photo. To use the flash correctly, this requires a great knowledge behind the simple hardware. One of the concept taught in this class is the "bound" of the flash light. The flash can be reflected towards our subjects through ceiling to avoid the light travels directly to humans' eyes yet still able to produce great photos.

Below were the photos taken with flash mode enabled.

f/5.6 | 1/10s | ISO 100 (Nikon D3000@52mm) 
Iphone4S in the dark.


f/5.6 | 1/10s | ISO 100 (Nikon D3000@18mm)
 The moving fan was freeze when flash mode enabled in a dark room.


f/5.6 | 1/10s | ISO 100 (Nikon D3000@26mm)
The shower and the water drops can be clearly seen once the flash mode was enabled.


With flash mode enabled, there was sufficient light provided to the camera. Thus, the shutter speed will be increased which is useful to freeze a motion in a dark situation.

Weekly Reflection 5- The Path to be Excel

Weekly Reflection 5
10/ 3/ 2014

Through the mastery of the settings of the exposures last week, in this week, Dr. Jamalludin taught us on the tips and tricks in using camera to produce a better quality of picture. As the exposure settings serve as the foundations of the world of the photographic, the tips and tricks, or the Do's and Don't's are the environment that beautify the world. In this reflection, the basic explanation on these tricks were provided as to explain every term clearly beyond the scope of the study.

TIPS AND TRICKS
  1.   The picture tells a story
  2.   Bird's Eye View (High Angle Shooting) indicates the subject is weak.
  3.   Worm's Eye View (Low Angle Shooting) indicates the subject is dominating.
  4.   Get down to the subjects level.
  5.   Use a plain background. 
  6.   Use flash outdoor properly.
  7.   Move in close.
  8.   Take some vertical pictures.
  9.   Focus lock on the subject.
10.   Move in from middle.
11.   Aware of the position of the light.
12.   Be a director.

The explanation of these tips can be best explained through the following website:

The 10 Tips and Tricks to Produce Good Pictures


THE BASIC COMPOSITION

  1.   Simplicity

  • Simple is the best
  • Less distraction, more focus on the objects
Focus on the Main Subject


  2.   The Rule of Thirds
  • A picture is divided into 9 portions with 3 rows and 3 columns.
  • The main focus in placed in either 1/3 or 2/3 of the frame, which is known as sweet spots.
  • Proper adjustment of the pictures to show the alignment.
The Rule of Third

  3.   Lines
  • Direct viewers to a certain focus point.
  • Diagonal lines are dynamic.
Lines Concept

  4.   Balance

    • Proper adjustment of the location of objects to show the correct alignment.
    • Good compensation between bright and dark.
    Balanced Alignment of the Moon and the Sky

      5.   Framing
    • A picture in another picture- gives the image depth and draws the attention.
    • Frames can become in the foreground or background of image.

    The Shadow Acts as A Frame

    Weekly Reflection 4- The Three Musketeers

    Weekly Reflection 4
    3/ 3/ 2014

    In this week, Dr. Jamalludin delivered an important lecture entitled as "The Three Musketeers" in the world of photography, which is known as the Aperture, Shutter Speed and ISO. 

    These three settings forms the foundation in this world and serves as the backbone to the body of photographing. In last week reflection, the preset mode, Aperture Priority and Shutter Priority were explained. These two settings are helpful for a beginner to start his photographic journey. As the journey goes on, mastering these settings by knowing how the changes of the settings affect one another guarantees a good and quality pictures to be produced. Thus, Dr. Jamalludin explained these settings which I summarized into these main points:

      1.   ISO
    • I defined myself ISO as "Image Sensitivity Optics", which indicated the level of sensitivity of the optics of the camera to the light. ISO is usually represented in numbers such as 100, 200, 400, 800, 1600 and HI-ISO. The smaller the number, the lower the sensitivity of the optics to the ligh. A lower ISO is usually set under sun light or when the environment is bright to avoid the pictures to be over-exposed.
      2.   Aperture
    • Aperture controls the size of the hole within the lens to limits the amount of light travels into the camera body. It also controls the depth of field, which is the portion of a scene that appears to be sharp in the picture. The aperture setting is usually represented by "f/" or "f-stop" which is known as "focal ratio" since the f-number is the ratio of the diameter of the lens aperture to the length of the lens.  The examples are f/1.8, f/2.8, f/5.6, f/10, f/22. As the numbers become larger, the size of the hole becomes smaller, and the depth of field becomes larger, then the pictures are sharp everywhere. If we wish to produce a picture which focuses on a certain part while leaving the background to be blurred off, the aperture has to be small to open up the size of the hole to focus on that particular part and thus, the depth of field is small which emphasized on that specific area.
      3.   Shutter Speed
    • As the name implies, this settings is related to the speed, or the length of time the shutter of the camera is opened to allow the light to travel into the camera body. Shutter speed is measured in fractions of seconds and represented as "1/" seconds. For examples, 1/250s means the shutter is opened for 1/250 seconds only. Thus, as the number of denominator increasing, the length of time becomes shorter, which the shutter will be shut off faster, and the light travels into the camera body will be lesser. A fast shutter speed is useful to freeze a motion of a moving object. However, it has to be advised that as the shutter speed increasing, it will produce a darker picture.
    These settings can be best represented in the picture below:

    Kruger-2-Kalahari (2008), The Three Musketeers

    By changing these exposure settings, the light exposure level can be used as an indicator to the quality of the pictures:

    Exposure Indicator
    The exposure indicator has to be in the middle which is the exact exposure of the light to the camera to produce the best quality of the picture.

    After knowing these three settings, it was time to put into practice. Dr. Jamalludin introduced to us a website to test our understanding on these exposure settings. The website is:


    I was grateful to be in this lecture as I really gained massive and useful knowledge today. To be excel in the world of photography with the passion of photography.

    Weekly Reflection 3- Touch UP!

    Weekly Reflection 3
    24/2/2014

    This week was an exciting week to be awaited for. It was because we were given the opportunity to borrow an DSLR to do our assignments!!!!

    THANK YOU!!!


    OH YEAH!! Thank you Dr. Jamaluddin, Encik Fuad and Faculty of Education to be so kind to lend us a DSLR as I have no one previously and now, with this opportunity I can learn more to be more skillful in photographing as the saying goes, "Practice Makes Perfect".

    --------------- Pictures of the Camera Will be Uploaded Soon -----------------------

    After we borrowed the DSLR from Encik Fuad from the Photography Lab, we happily returned back to our class to enjoy the lectures delivered by Dr. Jamalludin on SD card, basic settings of the camera and the preset scene modes in DSLR.

    SD card is an memory expansion slot to offer more space for storing pictures captured by the camera. The advancement of the technology brings us different levels of SD card to fulfill the needs of different requirements from different ages of customers. There are 3 types of SD cards:

    1. SDSC      - Secure Digital Standard Capacity (Maximum storage, 4GB)
    2. SDHC     - Secure Digital High Capacity (Maximum Storage, 32GB)
    3. SDXC     - Secure Digital eXtended Capacity (Maximum Storage, 2TB)
    Meanwhile, we can easily noticed there is a number in SD card which is encircled which is 4 and 10 in normal case. The bigger the number, the faster the transfer speed to save or store the pictures from the camera to the SD card. Usually the class 10 is used for video capturing.

    SDHC 32GB Class 10
    SDXC  GB Class 10
    After the description of the SD card, we learnt on the basic settings of the camera and how to interpret the logos from the camera screen. It is best illustrated from the pictures below:


    Lastly, the preset modes in mode dial camera were discussed which were listed as below:

      1.   Aperture Priority
    • It is symbolized by "A" or "Av" depending on the camera brands. Using this mode user can adjust the aperture settings freely while leaving the camera to adjust itself the shutter speed automatically. Aperture priority is useful when users want to control the amount of depth of field in  image. For example. the user wants to set aperture at a wide f/18 to blur the background or a narrow f/11 to have more of the scene to be in focus. This mode is usually preferable in normal shooting.
      2.   Shutter Priority
    • It is usually represented by "S" or "Tv". Using this mode user can adjust the shutter speed settings freely while leaving the camera to adjust itself the aperture automatically. Shutter priority is useful when users wants to freeze an action at a faster speed while produce a dark scene by leaving the shutter to open for a period of time.
      3.   Program Mode
    • It is usually capitalized by "P". In this mode camera takes over most decisions automatically. The difference between program mode and auto mode is that users are still given authority to change exposure setting other than aperture and shutter speed such as ISO, white balance, metering and using the exposure compensation to quickly brighten or darken a scene.
      4.   Manual Mode
    • "M" is for manual. This is the mode where user can adjust the shutter speed and aperture settings manually. Using this mode indicates the users are comfortable with both settings and clearly understand the effect of changing each other on another. The camera will adjust only the ISO settings, unless the user wants to adjust it manually too.
      5.   Dedicated Scenes
    • Other than the four modes mentioned above, there are other preset scene modes available in each types of camera. Depending on the brands, the icons differ from camera to camera, but usually there will be portrait, sport, macro, and landscape modes.
    Knowing what these modes can do is the best to help me to capture the most satisfactory pictures under different circumstances.

    Below were the photos of the camera I borrowed:

    The Package


    The Contents Inside


    Canon? Nikon?!

    --- The photos were taken using iPhone4S ---

    Saturday, April 5, 2014

    Weekly Reflection 2- Presentation

    Weekly Reflection 2
    17/2/2014

    Today as mentioned on last reflection, there will be three topics for presentation which were:

    1) General Issue- Types of Camera
    2) Digital SLR
    3) DSLR Brands- Nikon VS Canon

    I've chosen the first topic as my presentation. Through my own reading I figured out that basically there are three types of camera which are:

       1.  Compact Digital Camera
    • Compact Digital Camera can be best regarded as the most common and demanded camera available in the market as it is light weight, portable and user friendly. The other term is known as "Point and Shoot", which points the advantages that the settings of the camera are fully automatic preset with necessary scene modes to offer consumers with a variety modes of picture capture preference. Of course, it is cheap and affordable.
    • However, the main disadvantage of this type of camera is that it has a lots of technical drawbacks. Due to its compact size, the sensor of camera is small which limits the performance of the camera such as lots of shutter delay, sluggish when taking photos, limited zoom and tiny flash and lastly, limits in controlling capabilities and lens changing.

       2.  Advanced Digital Camera
    • As the name implies, "advanced" digital camera offers the customers a better range of performance compared to compact digital camera. It has better zoom and a wider length of focus range. Users have more control over exposure and it includes automatic feature while still having highly customizable advanced features. This type of camera has a higher quality of glass lenses. It looks like a DSLR but in fact it is not a DSLR.
    • However, although it has advanced features, users are still unable to change the lens and compared to DSLR, the zooming feature is shorter and still suffers from long delay and lag time when taking photos. Normally this type of camera has no mirror built inside the camera where users are not offered the view-finder feature but replaced with a LCD screen for capturing.
       3.  Digital Single Lens Reflex (DSLR)
    • This type of camera offers the most professional feature which enables users to change lens, which is then raise up the performance of the camera where users have more control over focus and zoom, better flexibility and capability with exposure, little or no lag time and produce better pictures. Users can use view-finder feature for capturing.
    • The two main disadvantages of this type of the camera are that it is highly expensive and it is not user-friendly. The accessories especially the lens are costly compared to digital compact camera and advanced digital camera. Moreover, the skills needed to fully uncover the potential of the camera is high which requires users to have adequate level of photographic knowledge to produce an image which is used to be as good as it is expected.
    I ended up my presentation by stating the increasing level of pricing and professionalism for these types of camera starting from Compact Digital Camera >> Advanced Digital Camera >> Digital Single Lens Reflex.

    The presentation was then continued by Nadwa on Digital SLR to discuss more on the information of this type of camera. One thing she noticed was the mirrorless interchangeable lens camera. As the name implies, this type of camera is "mirrorless" where it does not have the view-finder feature yet this type of camera is the same with DSLR where users can change the lens. Dr. Jamalludin showed us the example of this camera which is the Sony Nex Alpha.
    Sony Nex Alpha (Mirrorless Interchangeable Lens Camera)

    Dr. Jamalludin removed the lens to show us there is no mirror inside.
    Sony Nex Alpha (Lens Removed with No Mirror Embedded)

    Thus, this type of camera is leveled between Advanced Digital Camera and DSLR.

    Lastly, the presentation was done by Uzailun on Nikon VS Canon. Two models were compared which were the Canon EOS 7D and Nikon D300S. The hardware specifications and features offered by each type of camera were listed. To choose which brand of camera, there was no specific answer. The most important factors depended  are the budget of users, the level of knowledge and lastly, the requirements. If we are passionate in photographing, then it's recommended to get a DSLR which is good in long run while if we just want to get photos for memories, digital compact camera is the best choice. Lastly, Dr. Jamaluddin introduced us a website, www.snapsort.com as a reference for us to know more on choices of camera.

    With these presentation held, I was exposed to the greatness of the word of photographic. I knew I've discovered on the tip of the iceberg, thus I hope to learn more in this course.

    Weekly Reflection 1- Introduction to the Course

    Weekly Reflection 1
    10/2/2014

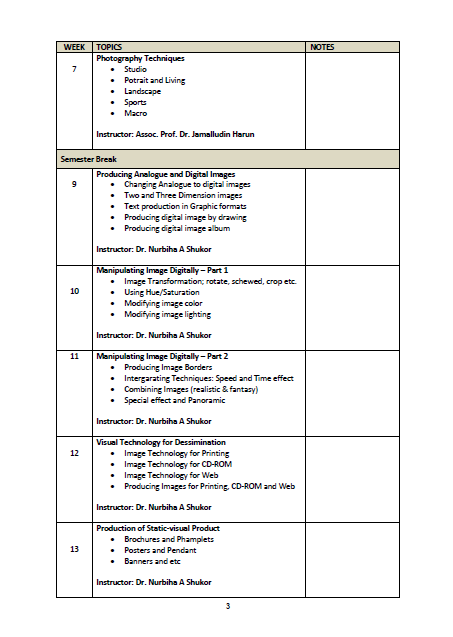
    Today was the first lecture of the course MPT 1483- Visual Technology Production. The lecturer who introduced the course outline with marks allocation was Assoc. Prof. Dr. Jamaluddin Harun and Dr. Nurbina A. Shukor. Dr. Jamaluddin was responsible to teach on the photography skills for the first half semester while Dr. Nurbina would continue on photographic software for the next half semester. The summary of the course outline was attached at the end of this post.

    The purpose I registered this course was simply to explore more on the photography world. We all know what is a camera and yet how to fully discover the potential of a camera shoots birds down. The adding knowledge on camera and the skills to take a better photo drove me to grab a seat in this course. I truly hope after this course I could advance my ability in taking photos and understanding in camera.

    For the first class, there was roughly fifteen students which I believed there will be more candidates as some might not be able to join the class today and some might register this course in the near future. For my first impression, Dr. was a kind and humorous lecturer who was able to bring up the learning atmosphere in the class to ensure a better understanding to the contents. I clearly felt students enjoyed listening to his teachings and of course, he was able to guide us well.

    The most interesting part in today's lecture was we're informed that we were able to borrow a DSL Camera from the department for self-learning purpose. What a lovely and unbelievable gift as a DSL camera was costly especially for us as students. This was a good news to give us a very first experience in using DSL before we decide to choose and buy our own DSL Camera. I was so excited to looking forward for my learning in this course.

    The class ended after the introduction was clearly described. Dr. Jamaluddin reminded us to check on elearning updates regularly and the topics for next week's presentations were given which were listed as below:
    1) General Issues (Types of Camera)
    2) DSL Camera
    3) Nikon VS Canon

    As a beginner in exploring the world of photography, I've chosen the first topic as my presentation next week. The reflection would be updated for the 2nd week's reflection.